We will be using GPT-3 from OpenAI, a 175 Billion parameter text transformer. Additonally we will be using NextJS and Replit to build and host our application. The purpose of this tutorial is to cover the basics in getting a web application powered by GPT-3 up and running.
We start with creating an account at Replit where we will import and initializing our project This will allow us to get a working build so that we can see our updates in realtime.
1. Getting Started with Replit
The first thing you will need to do is create a new Replit project. To do this, head over to Replit and sign up for an account if you do not already have one.
2. Create a new project
Once you logged into replit click the + sign in the top right corner.

3. Import GPT-3 boilerplate from Github
In this tutorial we will be using the GPT-3 boilerplate that will make our lives easier and allow you to build your own GPT-3 powered application in 20 minutes.
1. Click Import from Github
2. Past https://github.com/nextgrid/GPT-3-Nextjs-Tailwind-starter in the GitHub URL field
3. Click the Import from Github button

Installing Dependencies & Configuring our project
First thing we need to do is to add our GPT-3 API key from OpenAI. If you do not have one, you can get one by signing up at from beta.openai.com. Once your account is created, you can go to your profile and click the "API Keys" tab or simply click this link OpenAI API Keys.
Add our GPT-3 API key to .env file
1. Click the lock 🔒 icon on the right side
2. In the key field write OPENAI_API_KEY
3. In the value field write your GPT-3 API key that should look something like sk-tKyMX1XbOS***Agaa5qx89UToRCy

To set our OpenAI GPT-3 API Key we first need to click the lock 🔒 icon on the right side

In the key field write OPENAI_API_KEY In the value field write your GPT-3 API key
Update the run command
To start our application we need to update the run command.
1. In the run command field, change the command to npm run start to npm run dev
2. Click the Done button

Install dependencies and start development environment
Now it's time to install all the dependencies and start the development environment. Click the big green

To set our OpenAI GPT-3 API Key we first need to click the lock 🔒 icon on the right side
Wait for the development environment to install and start
Once you clicked the RUN button you will see a output in the concolse window where it first will install packages and then start out development server
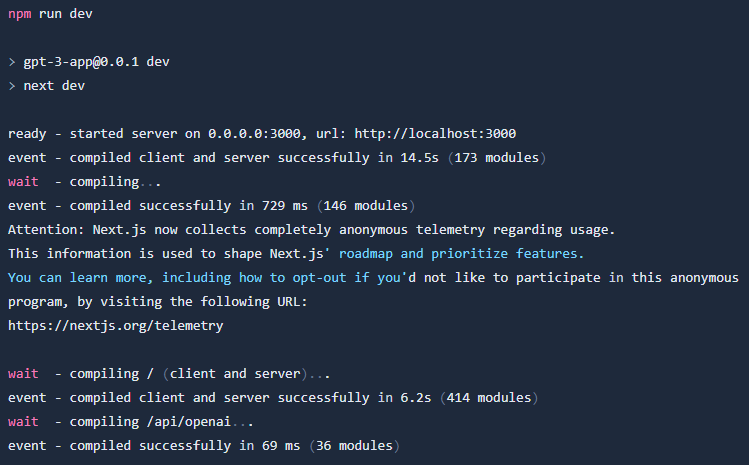
Once this is done you will see your webapp in the window above the console
To set our OpenAI GPT-3 API Key we first need to click the lock 🔒 icon on the right side
Once you updated your run command you can click the RUN button to install your depndencies and start the development environment.
Building our GPT-3 powered application
Right now we have a simple frontend connected to our GPT-3 powered backend. If you enter a text into the text field you will see the generated response. Let's try to enter a text and see what happens.
Enter a text into the text field and click the create button
Your input:
What is the distance to the moon from earth?
GPT-3 Output:
The distance to the moon from earth is about 384,400 kilometers.

Customize our GPT-3 powered application
At this stage you should have a GPT-3 powered application that you can use to generate text and now it's time to configure the application to our needs. In my case I will create a GPT-3 powered application that help to summarize a article that we can use as our copy for a social media post.
Configuring the API endpoint
Start with open up /pages/api/openai.js The file should look something like this
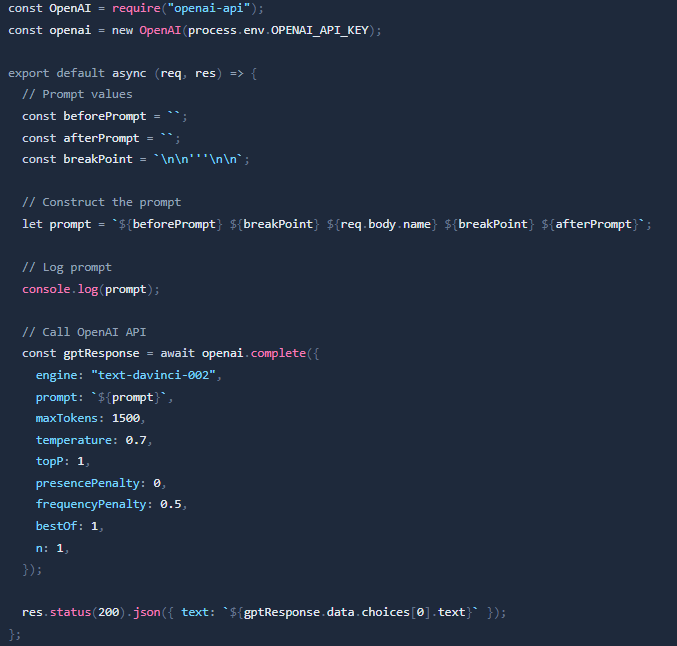
To make our life easier I have added the following values
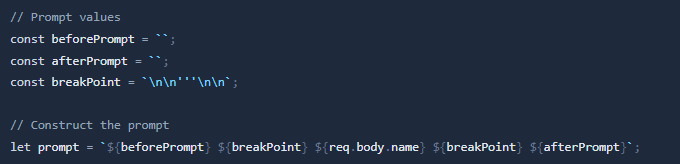
The $beforePrompt and $afterPrompt will make it easy for us to add the values we want to appear before and after our prompt before it's send to GPT-3 API.
As I am building a social media post generator I will use the following values

Lets update our frontend to reflect our applications fuctions
Open /pages/index.js and edit the <title>, H1 and <p> tags to reflect our applications functionalities
Time to test our application and the result
I have choosen following article that I found on Techcrunch to try the application with.

Once clicking the **create** button you will see the generated text in the console.
Instagram has just announced a new feature that allows businesses to boost their Reels to turn them into ads! This is a great way to reach new audiences and get your brand story out there. Remember to check your Insights to see which ads performed the best.
Final words
Hope you enjoyed this simple tutorial. Hopefully you now have a simple fundation that will allow you to build other type of applications.